Segments
Leverage segments to group and filter user sessions, gaining deeper insights into behavior patterns and optimizing your analytics.
Overview
Segments allow you to filter and categorize user sessions based on specific criteria. By creating custom segments, you can analyze user behavior across different user groups, devices, timeframes, or even interactions within your application. This powerful feature enables targeted insights that help you understand trends, identify problems, and optimize user experience.
In this section, we’ll walk you through the process of creating, managing, and analyzing segments within your analytics dashboard, providing actionable insights into user behavior.
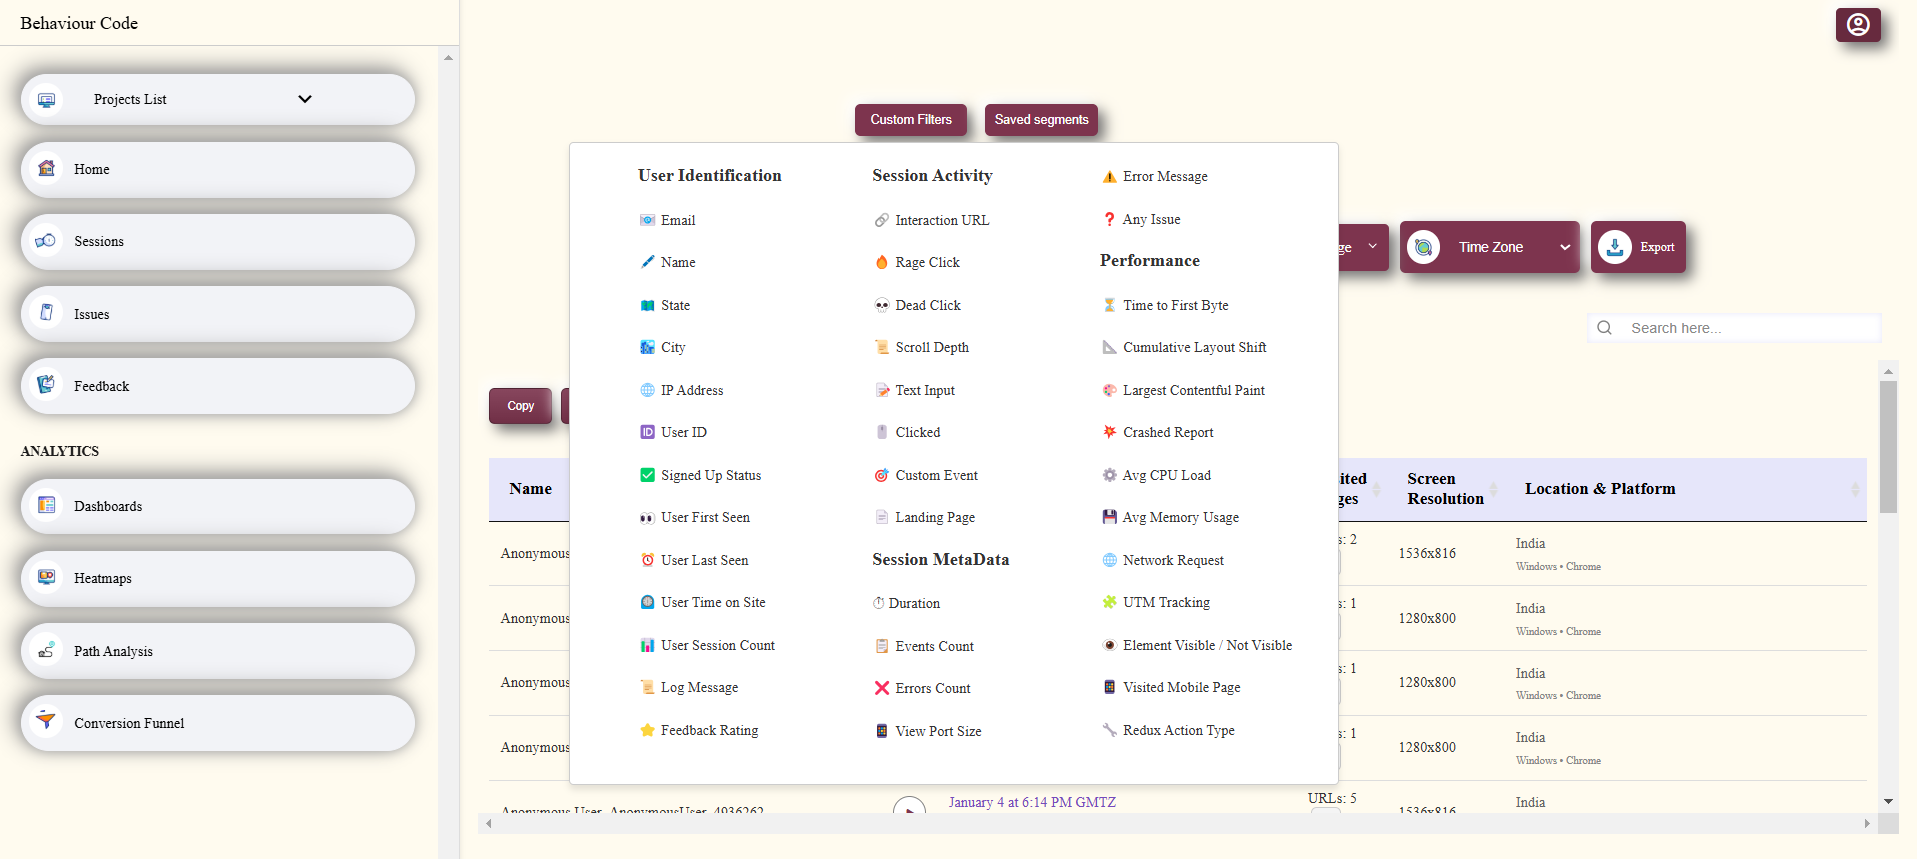
User Identification
Available Filters:
- Email: Filter by the user's email address.
- Name: Filter by the user's name.
- State: Filter by the user's state.
- City: Filter by the user's city.
- IP Address: Filter by the user's IP address.
- User ID: Filter by the unique user ID.
- Signed Up Status: Filter by whether the user has signed up or not.
- User First Seen: Filter by the first time the user was seen.
- User Last Seen: Filter by the last time the user was seen.
- User Time on Site: Filter by the total time spent on the site.
- User Session Count: Filter by the total number of sessions the user has had.
- Log Message: Filter by the log messages related to the user.
- Feedback Rating: Filter by the feedback rating provided by the user.
Session Activity
Available Filters:
- Interaction URL: Filter by the specific URL the user interacted with.
- Rage Click: Filter by sessions where users performed rage clicks (multiple quick clicks in succession).
- Dead Click: Filter by sessions with dead clicks (clicks on non-interactive elements).
- Scroll Depth: Filter by how far the user scrolled down the page.
- Text Input: Filter by sessions where the user interacted with text input fields.
- Clicked: Filter by whether or not the user clicked on any elements.
- Custom Event: Filter by any custom events triggered during the session.
- Landing Page: Filter by the landing page the user visited.
Performance
Available Filters:
- Time to First Byte: Filter by the time taken for the first byte to be received by the user.
- Cumulative Layout Shift: Filter by layout shifts that affect the page stability.
- Largest Contentful Paint: Filter by the time it takes for the largest contentful element to appear.
- Crashed Report: Filter by whether the session resulted in a crash.
- Avg CPU Load: Filter by the average CPU load during the session.
- Network Request: Filter by the network requests made during the session.
- UTM Tracking: Filter by UTM parameters used for campaign tracking.
- Element Visible / Not Visible: Filter by whether elements were visible or not visible during the session.
- Visited Mobile Page: Filter by whether the user visited the mobile version of the page.
- Redux Action Type: Filter by the Redux action types triggered during the session.
Session MetaData
Available Filters:
- Duration: Filter by the duration of the session.
- Events Count: Filter by the number of events triggered in the session.
- X Errors Count: Filter by the number of errors during the session.
- View Port Size: Filter by the viewport size during the session.
- Error Message: Filter by any error messages generated during the session.
- Any Issues: Filter by sessions where any issues occurred.
Key Features
Custom Segment Creation
Build segments based on a variety of filters including user attributes, session behavior, device type, geographic location, and more. Tailor these segments to focus on particular user actions or characteristics that are crucial for your analysis.
Dynamic Filtering
Apply dynamic filters in real-time to refine the data presented in your dashboard. This allows you to instantly drill down into the most relevant user sessions and uncover trends or anomalies as they happen.
Predefined Segments
Use predefined segments to quickly segment users by common criteria, such as user type (new vs. returning), device (mobile vs. desktop), or user location. These segments can serve as a baseline for deeper analysis and troubleshooting.
Advanced Metrics by Segment
Analyze key performance indicators (KPIs) and metrics for specific segments. Metrics like session duration, page load time, engagement, and conversion rates are available to provide a granular view of user behavior within each segment.
Real-time Session Tracking
Track user sessions in real-time across all segments, making it easier to diagnose issues, identify behavior patterns, and improve the overall performance of your website.
How to Use Segments
Create a New Segment
To create a new segment, go to the Segments tab in your dashboard and click on Create New Segment. From there, you can define the segment criteria by selecting filters such as:
- User Attributes: Filter by user properties like location, device, or browser type.
- Behavioral Triggers: Select behaviors such as page views, button clicks, or form submissions.
- Session Data: Filter by session duration, page load times, or errors encountered during the session.
- Timeframe: Specify the date range or session time to focus on specific periods.
After applying the filters, click Create to save your segment. This segment will now be available for detailed analysis and can be applied to various reports and visualizations.
View and Analyze Segments
Once you have created segments, you can view them in the Segments dashboard. Each segment will display key metrics such as average session duration, bounce rates, and any other custom metrics you have chosen to track. Use the interactive graphs and tables to analyze performance trends for each segment.
To compare multiple segments side-by-side, select them from the dropdown and apply them to the same report or visualization. This allows you to analyze the differences in user behavior between distinct groups, uncovering deeper insights.
Apply Segments to Other Reports
Segments can be applied across other product analytics reports, including session replays, heatmaps, and user journey analytics. This ensures that the insights you gain from segments can be used across various features, helping you pinpoint areas for improvement and enhance your optimization efforts.
Edit or Delete a Segment
To edit an existing segment, go to the Segments tab, select the segment you want to update, and click Edit. Modify the filters as needed, then save your changes. To delete a segment, select it and click Delete. Be aware that deleting a segment is permanent, and it will no longer be available for future use.
Best Practices
Start with Broad Segments
When creating segments, start by defining broad segments and gradually narrow them down. This helps you avoid losing valuable insights by prematurely limiting your data.
Combine Multiple Filters
For deeper insights, combine multiple filters. For example, create a segment for users who are located in a specific region and have experienced slow page loads. This combination can reveal performance bottlenecks affecting a particular group of users.
Use Segments to Track Conversions
Track conversion rates by segment to understand how different user groups are performing. For example, compare new users vs. returning users or mobile users vs. desktop users to determine which segments are most likely to convert.
Regularly Update Your Segments
Review and update your segments periodically. As your application evolves, new user behaviors and patterns may emerge. Regular updates ensure that your segments remain relevant and provide valuable insights.
Conclusion
Segments are a powerful tool for organizing and analyzing user data in your analytics platform. By filtering user sessions based on specific criteria, you can gain actionable insights that help you optimize performance, enhance user experience, and drive conversions. Use segments to focus on the most relevant data and uncover trends that can help improve your website’s overall performance.